Tuesday, December 30, 2008

TWD: Tall & Creamy Cheesecake


I find that sometimes I'll use a particular kitchen product for years and never realize that the product is lacking in any respect -- until the manufacturer introduces a newer, slicker, more task-specific version of the product, and ONLY THEN do I realize that I've been improperly equipped in the kitchen all along. Take, for example, Pam. I thought for years that Original Pam was sufficient for all of my spray oil needs. But then all of a sudden it seemed like every other time I went to the grocery store, a new Pam would appear on the shelves along with Original Pam. And if Baking Pam (with Flour) now exists, then, by implication, Original Pam must be inadequate for preparing my muffin pans, correct? And they would not be willing to sell me Grilling Pam if Original Pam could be counted on to prevent burger stickage (hey, we're not playing Scrabble -- I can make up words if I feel like it!) in high heat situations. Butter Pam? I never knew I needed it until it existed. Olive Oil Pam? Organic Canola Pam? Must be a good reason for them, that's what I say.


Similarly, I had never noticed the multitude of foil choices available to me until I started gearing up to make this Tall & Creamy Cheesecake. During the course of exchanging comments earlier in the month, Nancy of The Dogs Eat the Crumbs warned me about water infiltration into her springform pan, despite the fact that she double wrapped her pan. After reading her full account last week, and seeing how well wrapped her pan was, I became seriously worried -- if my talented and competent bloggy friends have trouble with this sort of thing, what chance do I stand? But by a pure stroke of good fortune (although it didn't seem that way as I set out on my fourth grocery trip of the day on 12/23!), I realized that I was out of foil when it was time to make the cheesecake, so I had to go back to the store for more. And once I got to the foil aisle, I realized that I had choices. Big time choices. There is regular old Reynolds, of course. Reynolds Nonstick. Reynolds Heavy Strength. Reynolds Super Strength. Reynolds Cheesecake Bathing Waterproof. Er, okay, so that last one was actually not available in my little city.

So it came down to Reynolds Heavy Strength and Reynolds Super Strength, but even after studying the packages I could see no real discernible difference between the two -- both are great for "lining," "grilling," and "freezing." The only difference that I could see is that Super Strength is also recommended for "tenting," whereas you don't even want to know what could happen if you try to tent with Heavy Strength. How to choose, how to choose? Oh, hell, I'll get them both. But I'm still worried. You don't understand, Reynolds. This cheesecake is to be THE Christmas dessert for the entire fam. My sister and her hubs endured nightmarish travel woes to be with us for Christmas. My cheesecake just can't be a waterlogged flop -- I don't have a plan B. This is one of my toughest situations. Can you handle it?


Alrighty then! I wrapped the pan in one layer of Reynolds Heavy Strength and one layer of Reynolds Super Strength, because nobody has ever accused me of being a Decider.


The Reynolds Heavy Strength/Super Strength tandem worked like a charm. I actually made this cheesecake twice, for two different family gatherings. The first time there was no water in the foil at all. The second time there was some water in the second layer of foil, but none in the first layer (the one actually wrapping the pan). Even though it didn't affect the cheesecake, the fact that a little water got into one of the layers one of the times I baked this will forever make the cheesecake water bath a frightening undertaking for me. Much like baking yeast breads, I think I'll always view it as kind of a crapshoot over which I have little real control.

Here is a peek of the cheesecake luxuriating in its water bath:


Just for an hour, I want to be a Tall & Creamy Cheesecake.

The first time I made this, the crust worried me a little -- I'm not sure if I used too many graham crackers or too little butter, but it seemed a little dry, and I had somewhat of a hard time pressing it into the pan. But it cooked up fine and tasted delicious.


The second time I made it, the graham cracker mixture seemed to have a better consistency. I thought the finished crust was even better the second time around.

The cheesecake mixture itself needs a lot of work to achieve a nice smooth consistency, but the Kitchen Aid handles most of it:


I felt like I had to add something every few minutes, but other than that I was pretty much free to go off and do other things, which really suited my non-focused personality. Add some sugar, go wrap a present, empty the dryer, beat in some vanilla, pull my 16 month old off the stairs, add an egg, pretend to be a kitty, flip through the thirty fourth Restoration Hardware catalog we've gotten since Thanksgiving, add another egg, check the mail, update my Facebook status to let everyone know I just got the mail, add another egg. This is my kind of kitchen project, and I loved how I didn't need to worry about overmixing or burning down the house like I do with most things I make. In fact, I think that getting distracted, forgetting about it, and letting it mix for a few extra minutes actually helps it attain that irresistible smooth & creamy texture. That's my story, anyway, and I'm sticking to it!


It should be obvious by now that I am no photographer, and I am usually just fine with that fact, but these pictures really bug me, because I thought the cheesecake(s) were really beautiful, and the pictures just really don't do them justice at all. The top of my first cheesecake (shown) was a little darker than the top of my second cheesecake, but not nearly as dark as the picture would indicate; it had a nice light golden brown color. Someday, I will learn how to take a decent picture.

This cheesecake was spectacular. I served it with Dorie's raspberry coulis from page 467 of Baking (I made it with frozen raspberries, because fresh raspberries were nowhere to be found in this town on Christmas Eve, and added a little bit of Chambord to it). I still can't believe I made something that tasted this good (twice!) I think David would tell you that this was the best dessert I've made so far. My sister had never had cheesecake before (???????????) and said that she had no idea what she'd been missing all these years. My mother said that this was the best cheesecake she'd ever had. And of course you can trust my mom's objectivity about my cheesecake, but just in case you didn't, I'll tell you that my mother-in-law loved it too! (Actually, that won't really give you any more objective information about this cheesecake, because I have the world's greatest MIL, and she is as likely as my own mother to think that some cheesecake I made is better than it actually is.) Anyway, David's mom raved about the "pure cheesecakey goodness," and I think that about sums up the essence of this cheesecake as well as anything.

I thought this was the perfect cheesecake. I know that there are hundreds of options for playing around with this, but I will have a really hard time deviating AT ALL from the recipe as written. This cheesecake is destined to become a go-to special occasion dessert for me.

I am not at all surprised that the wonderful and talented Anne Strawberry would treat her fellow TWD bakers to the perfect December pick. Anne's is one of the first food blogs I started reading, and she seems to have a special gift for choosing the perfect food for any occasion. Her creations are always beautiful, and her presentations are festive, elegant and stunning. Anne, I would not have made this if you hadn't picked it, and my family and I would have missed out on a really special Christmas dessert. I cannot thank you enough for this fabulous selection!

Tuesday, December 23, 2008

TWD: Figgy Real Butterscotch Pudding, or "Actually, I WILL go before I get some."


This week's Tuesdays With Dorie selection is Real Butterscotch Pudding, chosen by Donna of Spatulas, Corkscrews & Suitcases. I'll say this much, if you are invited somewhere for dinner and offer to bring the dessert, you can feel pretty confident that your hosts are not expecting butterscotch pudding. So this definitely has that "surprise element" going for it. Also, since there is no way that I'll be able to bluff my way through this entire post, let me just go ahead and say at the outset that until I read the recipe, I had no idea that butterscotch is made out of butter and scotch. I guess I just always thought that butterscotch was its own . . . thing. You know, the way that coconut is just coconut -- it's not made out of coco(a) and nuts? Right? Who's with me?

Well, once I learned that butterscotch = butter + scotch, I assumed that meant yet another trip to the package store for me, since neither of us drink scotch and therefore I figured we didn't have any. But when I dug into the depths of our sunscreen/bugspray/liquor cabinet (we are a professional organizer's worst nightmare)

I realized that we had not one, not two, but three bottles of scotch from which to choose:

.

My husband received all of these bottles as holiday gifts from business associates over the years. Apparently, he has that "scotch drinker" look about him.

In order to figure out which scotch to use, I decided to do a little research on the characteristics that are distinctive to fine single malt scotches. There are hundreds of pages devoted to this topic, and I don't know if I'm just grumpy or lacking intellectual curiosity or burned out from the holiday frenzy or what, but about two minutes into my research I realized that I just really don't care about fine single malt scotches. at. all. I decided to do eeny meeny miney moe instead, and the winner was {drumroll please} . . . .


Making the pudding was remarkably quick and easy. I started it at 11 p.m. after a long night of present wrapping, and it was in the fridge by 11:30. It starts out with my most feared kitchen task, boiling sugar:


Standing there and not walking away from it while it was boiling made ALL the difference in avoiding an unfettered disaster. Who knew?

After mixing some stuff up in the food processor (I can't remember what, but be sure to check Donna's blog for the recipe!), you slowly pour in the hot liquid to the running food processor. I was positive that this was going to explode on me, but it didn't. It really is true that we are not given more than we can handle. After a quick processing, return it to the pan to thicken it up.

My only previous foray into pudding thickening was with the arborio rice pudding, and that was a rough road. My first attempt with that resulted in rice soup, and my second attempt turned out somewhat better, but new babies got their learner's permits in the time that it took to thicken. But this butterscotch pudding thickened up beautifully:

It smelled SO good while it was cooking. It really smelled like it would be perfect just as it was, but there was still butter, vanilla and scotch to be added.

I am not really a "hard liquor" kind of gal. I can generally only deal with it if the liquor flavor is heavily masked by mixers. Back in my pre-kid days, when we'd go to the Blue Monkey with friends after work, I'd order something like a Sweet Tartini and immediately cease to be taken seriously by everyone at the table. So I feared that I would not enjoy this pudding because of the scotch. But I remained optimistic, thinking that the combination of butter + vanilla + scotch + sugar + general Dorie magic would result in a whole new flavor, "butterscotch," which I knew that I liked, having had it many times before without ever detecting so much as a trace of "scotch."

Unfortunately, when I finally tried the pudding, I felt like I was spoon-feeding myself a Glenlivet, which is so wrong on so many levels. I am still kicking myself for not leaving the scotch out of at least half of the pudding, because I really think I would have enjoyed this much more without it. I also read in the P&Q (too late) that someone added the scotch during the cooking process, which helped burn some of it off -- that's another great idea. But for my taste, the scotch was just overpowering.


I really enjoyed making this anyway. It was fun to watch the ingredients morph into actual pudding. And I think that I would have honestly loved this without the scotch. Thanks for the fun pick, Donna! And Merry Christmas, everyone!

EDITED ON 12/23, 7:50 AM: I finally got a chance to ask David what he thought about this -- we've been like two ships passing in the night with all of the Christmas running around that's been going on. He said "I wouldn't want to eat it after every meal, but I liked it. Generally, I like to eat dessert and I like to drink booze, but I prefer to keep them separate. But there is something kind of festive about sneaking your hooch in your treats."

Thursday, December 18, 2008

CEIMB: Curried Butternut Squash Soup


I wasn't going to make this soup, because it is December 18 and I have not (1) finished my Christmas shopping, or (2) planned my Christmas menus, both of which I blame on blogging and Facebook. Last year at this time, I had a screaming, non-sleeping newborn in the house but STILL was not in any danger of missing Amazon's regular shipping deadline. But now, instead of shopping when I am online, I do things like watch the "Do They Know It's Christmas" video that a friend posted on her Facebook page, and then exchange comments about how there is a lot of hair in that video, how Sting was really much much hotter than Simon LeBon, which we didn't realize as silly 12 year olds, and how we never did see the George Michael thing coming.

So I had sworn off Facebook until after the New Year, as well as most of my blogging projects except for TWD. Because when it starts to affect my ability to shop, clearly it's gone too far. But then I realized that this week's CEIMB pick was selected by one of my favorite blogging friends, Mary Ann from Meet me in the Kitchen, and I knew that I wanted to make it. And I sure am glad that I did!

Mary Ann really does love her fellow bloggers, because she picked a recipe that was super quick and easy to make. Thank you, Mare! It was also seriously delicious. I have a butternut squash "thing" -- the butternut squash risotto that we made with Barefoot Bloggers was one of the best things I've ever eaten, and Proud Italian Cook's butternut squash lasagna almost made me weep, it was so amazing. My sister and her husband made a phenomenal butternut squash soup on Thanksgiving, which moved me so much that I asked for an immersion blender for Christmas (other wives ask for jewelry, so I really am a bargain!) So if butternut squash is the featured ingredient, I am bound to enjoy it.

The hardest part of this recipe is prepping the butternut squash (which really just isn't that hard when you get right down to it, although it's fun to complain about). Cook up your garlic and onion, add the squash, broth and curry and boil up for about 15 minutes, take it off the heat and add some honey, and then puree it in the pan with your immersion blender (if you have one) or in a regular blender.

My friend Amanda made this a few days ago, and came into my office one morning and said "see this burn? I felt like you in the kitchen!" Apparently the top came flying off her blender when she went to puree it and she was scalded by the liquid. Ouch! Yeah, that would happen to me. And I was particularly worried about a "liquid hot magma explosion" variety of kitchen disaster, because I nearly always have little people attached to my legs when I cook (although I did manage to shoo them away with some kiddie TV crack before turning on the blender). But thanks to Amanda's warning to hold the lid down tight, I didn't have any trouble -- my soup stayed in the blender, and I emerged burn-free.


I am usually kind of iffy on curry. I thought about leaving it out, but decided to cut the recipe in half and make it as is. As it turns out, I loved the flavor of this soup (I didn't even offer any to David because he hates curry). The only problem that I had is that I think I should have pureed it a little longer. The texture wasn't as smooth as I would have liked, which was probably due to the fact that I was scared to death of the soup flying out of the blender so I cut it off as soon as it looked smooth to the naked eye. But the soup was flavorful and rich-tasting -- I would definitely make this again. Especially if I have a shiny new immersion blender that needs a little test drive around December 26!

Thanks for this great pick, Mare!

Curried Butternut Squash Soup, from Ellie Krieger's The Food You Crave

Ingredients

1 tablespoon canola oil
1 medium onion, chopped (about 2 cups)
2 cloves garlic, minced
1 (2 1/2-pound) butternut squash, peeled, seeded and cut into 1-inch cubes
6 cups low-sodium chicken broth or vegetable broth
1 tablespoon plus 2 teaspoons curry powder
1/2 teaspoon salt, plus more, to taste
2 tablespoons honey
4 teaspoons plain low-fat yogurt, for garnish

Directions

Heat oil over medium heat in a 6-quart stockpot. Add onions and garlic and saute until soft but not brown, about 6 to 7 minutes. Add the butternut squash, broth, curry powder and salt and bring to a boil. Reduce heat and simmer until squash is tender, about 12 to 15 minutes. Remove from heat stir in honey and puree with an immersion blender or in batches in a blender until smooth. Season with salt, to taste.

Ladle into serving bowls and add a dollop of yogurt.

Tuesday, December 16, 2008

TWD: Buttery Jam Cookies


I know that there ought to be a law against this, but here I am blogging at close to midnight on Monday night after having spent the past two hours at Toys R Us. Yes, as a matter of fact it WAS as bad as it sounds. I thought I'd be the only poor fool there at that hour, but oh no. I actually had to dodge crowds of people while wandering through the aisles past things like the Tini Puppini (I saw "Toffee," who is billed as the "Hollywood Trendsetter" of Tini Puppini dogs; she comes with a monogrammed Tini Puppini brush, a sparkly tiara hair accessory, a ruby red necklace, and gold puppy bling). And I can dutifully report that Elmo is STILL VERRRRRRRRRRRRRRRRRRRY TICKLISH, because he yelled it at me every time I walked past him on aisle 14. I passed a veritable ocean of saucy hoochie mama dolls, and I was a slightly happier person before I ever knew that a board game called "Toss Your Cookies -- The Chunk-a-licious Card Game" even existed.

So forgive me if I seem a little bit surly tonight.

But moving on to cookies! It's a regular cookie-baking bonanza this month for weekly bakers and occasional bakers alike, and we're right in the thick of the action here at TWD with our third cookie in as many weeks -- this time, it's Buttery Jam Cookies, chosen by Heather of Randomosity and the Girl. And to celebrate the majesty of the cookie, last week Slate treated us to a fascinating discussion between David Lebovitz, Sara Dickerman and our own beloved Dorie Greenspan on The State of the Cookie. We all love to eat cookies, love to bake cookies, and love to share cookies with our family and friends -- but how often do we really ponder the cookie? Well, Dorie, David and Sara have done just that, so even if you have to wait until your schedule calms down in January, it is definitely worth visiting Slate for a peek as Dorie, David and Sara chew on nearly every aspect of the cookie, asking the big questions, like What makes a cookie a cookie? What makes a cookie more "American" as opposed to "European?" What is the optimal cookie size? And what does the future hold for our friend the cookie?

When the conversation turns to possible future cutting edge cookie technologies, Dorie says that she thinks that cookies are almost "too basic" to be brought into the techno age, and in her view that is a good thing. I wholeheartedly agree with her, and I think that pretty much strikes at the heart of why I love to bake. Because while technology has radically changed so much about so many aspects of the way we live -- how we communicate, how we gather and share information, how we are entertained -- cookie baking is essentially the same today as it has always been. Our pans and ovens may be more high tech, and we do have Silpat now, as Dorie notes (an innovation that I do not begrudge, and in fact have asked for for Christmas) but the fundamentals of baking remain largely unaffected by technology. When I bake with my kids, I'm instantly transported back twenty-five years to when my sister and I would bake with my mother -- the dough tastes the same, the kitchen smells the same, the bickering over who gets to use the big snowman cookie cutter is the same, the first bite of that warm "just out of the oven" cookie is just as magical. There is something deeply comforting in knowing that ten, twenty, and one hundred years from now, butter and sugar will still have to be creamed, dry ingredients will still have to be slowly mixed in until "just combined," and those suckers will still have to bake for 9 to 11 minutes.

Of course, just as the cookie-baking process is one constant in an otherwise rapidly changing world, so is my knack for screwing up the cookie-baking process. Dorie warns about overmixing this dough, and when I get warned not to overmix, you can pretty much count on me to undermix:


See that flour? Yeah, you could kind of taste it, too.

I made my cookies with apricot jam, which was really tasty, once you got past that vague flourish feeling in your mouth. Actually, David said that he liked these and did not mention the flour issue, and I can usually count on him to be brutally honest with me. Here they are out of the oven:


In the true Christmas spirit, I decided to do something extra special with a few of my cookies, and in order to do that I had to conjure up the ghost of Marley. No, not that Marley, the other one:


That's right -- it's your favorite Rastafarian, and mine too, Bob Marley. Once I could feel Bob's presence in my kitchen, I proceeded to make some cookies that were not just jammin', but

Ooh, yeah! all right!
Were jammin:
I wanna jam it wid you.
Were jammin, jammin,
And I hope you like jammin, too.


My "not just jammin', but jammin' jammin'" cookies:


These were made with the same apricot jam dough as the rest of the cookies, but I made them into thumbprint cookies and filled the thumbprints with some blackberry jam that we brought home from a recent vacation. If you like jam in your cookies, you'll really enjoy these. We liked them so much that I might do them all the jammin' jammin' way next time. And I hope this jam is gonna last.

My little one year old had to get her shots the day that I made these cookies, and afterwards the poor thing was about as miserable as I've ever seen her (and that's saying something, as this is the same child who screamed bloody murder for the first three months of her life). But as soon as I gave her one of these cookies, her mood instantly turned around. It was a miracle! I might just keep a batch of these in the freezer for all of our pediatrician visits!


Anyway, to recap, I liked these but thought they were a little flourish due to my undermixing, Caroline happily licked the same cookie for 45 minutes, and David claimed to enjoy them and said nothing about the flour situation. I tried to get Jacob and Elizabeth to try these, but they heard "jam cookie" and immediately announced that they don't like jam. I generally do not waste my limited "you must eat this!!" energy trying to persuade my kids to eat desserts, but in that great Ralphie holiday tradition, I dared them, double dared them, double dog dared them and then pulled out the mighty TRIPLE DOG DARE in an effort to get them to try these cookies, but no dice. But somehow the cookies still disappeared within a day or two even with only three of us eating them. Oh well, nothing that some double Spanx can't handle. That's how Gwyneth does it -- she says so herself.

You can find the recipe for these yummy cookies over at Heather's website. And thank you, Heather, for this great pick!

Sunday, December 14, 2008

Ina's Easy Sticky Buns


When I was in Barnes & Noble the other day, I picked up a copy of Ina's new book, Back to Basics, which immediately landed me a spot on the "naughty" list, since I am not supposed to buy things for myself right before Christmas. But I figured if there was ever a time to pick up some pointers on returning to the basics, Ina-style, it would be in the weeks leading up to Christmas. I christened the book with her coq a vin, which didn't work out so well for me, but I blame that on the chef and not the recipe.

When I was flipping through the book, the recipe for Easy Sticky Buns immediately caught my attention. I love sticky buns and have long wanted to make them, but the yeast thing usually stops me at the last minute. Because believe it or not, I don't actually enjoy kitchen failure, even though I experience it a lot. It makes me cranky, and who wants to be a Scrooge this time of year? I especially dislike failing after investing 48 hours of kneading/waiting/rising time into a kitchen project. So the vast majority of the time, when I come eyeball to eyeball with a sticky bun recipe, I'll blink and end up going with something like cinnamon muffins instead.

But Ina's Easy Sticky Buns are made with frozen puff pastry sheets, so you won't need to deal with yeast bread maybe rising and maybe not, and you won't have to clear two days out of your schedule to make them. How did I live for almost 36 years without knowing about frozen puff pastry sheets? These things can make even a hack like me feel like a real pastry chef! Only you and I will have to know the truth.

You start out my mixing together some butter and brown sugar, and dropping the mixture into a muffin tin by the tablespoon. Top with chopped pecans (or leave them off of some if you plan to serve to people who are allergic to nuts or just don't like them. I kept a couple nut-free for my one year old, who shouldn't have nuts yet):


Unroll the puff pastry sheets, brush with melted butter, and top with brown sugar, cinnamon and raisins:


Roll up like a jelly roll, ending up with the seam side down:


Cut each roll into 6 even pieces (about 1.5 inches wide). I tried to eyeball at first and made light marks on the top of the pastry with the knife, and ended up with twenty-four 1/8 inch rolls, four 1/2 inch rolls and one seven inch roll. Then I got a ruler out and was able to mark off six 1.5 inch rolls:


Place cut side up on top of the butter/sugar/pecan mixture in the muffin tins.


Place muffin tin on baking sheet lined with parchment and place into a 400 degree oven for 30 minutes. They smell unreal when they are baking, and they come out looking golden and puffy:


These are seriously delicious sticky buns. Are there better sticky bun recipes? Probably, but for 10 minutes of prep time and 30 minutes of baking time, I think these can hold their own with any sticky buns out there. Thank you, Ina, for bringing real, mouthwatering sticky buns within the reach of the marginally-talented home baker!


EASY STICKY BUNS, from Barefoot Contessa Back to Basics

12 tablespoons (1 & 1/2 sticks) unsalted butter, at room temperature
1/3 cup light brown sugar, lightly packed
1/2 cup pecans, chopped in very large pieces
1 package (17.3 ounces/ 2 sheets) frozen puff pastry, defrosted

FOR THE FILLING:
2 tablespoon unsalted butter, melted and cooled
2/3 cup light brown sugar, lightly packed
3 teaspoons ground cinnamon
1 cup raisins


Preheat the oven to 400 degrees. Place a 12-cup standard muffin tin on a sheet pan lined with parchment paper.

In the bowl of an electric mixer fitted with the paddle attachment, combine the 12 tablespoons butter and 1/3 cup brown sugar. Place 1 rounded tablespoon of the mixture in each of the 12 muffin cups. Distribute the pecans evenly among the 12 muffin cups on top of the butter and sugar mixture.

Lightly flour a wooden board or stone surface. Unfold one sheet of puff pastry with the folds going left to right. Brush the whole sheet with half of the melted butter. Leaving a 1-inch border on the puff pastry, sprinkle each sheet with 1/3 cup of the brown sugar, 1½ teaspoons of the cinnamon, and ½ cup of the raisins. Starting with the end nearest you, roll the pastry up snugly like a jelly roll around the filling, finishing the roll with the seam side down. Trim the ends of the roll about ½ inch and discard. Slice the roll in 6 equal pieces, each about 1½ inches wide. Place each piece, spiral side up, in 6 of the muffin cups. Repeat with the second sheet of puff pastry to make 12 sticky buns.

Bake for 30 minutes, until the sticky buns are golden to dark brown on top and firm to the touch. Allow to cool for 5 minutes only, invert the buns onto the parchment paper (ease the filling and pecans out onto the buns with a spoon) and cool completely.

Thursday, December 11, 2008

Coq a Vin and Cornmeal Crusted Roasted Ratatouille Tart: Wednesday Night Dinner for the Overachiever


We have a special Thursday doubleheader today, with this being a scheduled posting day for both the Barefoot Bloggers and the Craving Ellie in My Belly gang. Wednesday may be Prince Spaghetti Day for some people, but for us wild and crazy food bloggers, it's Coq a Vin and Cornmeal Crusted Roasted Ratatouille Tart Day!

BAREFOOT

Coq a Vin is the Barefoot selection, chosen by Bethany of This Little Piggy Went To Market. I was intimidated when I first learned that coq a vin was one of the December Barefoot recipes. December is a busy month, and coq a vin sounded complicated -- a good February recipe, really. But in her new book, Back to Basics, Ina assures us that coq a vin is really easy. Easy as boiling water? Easy as a pot roast? How easy is it, Ina? In her own words:

Over the years I've tried many times to make a good coq a vin, the renowned French chicken stew with red wine, but with disappointing results. My television producer Olivia Grove one day told me, "Well, it's just beef bourguignon with chicken," and I thought, "So it is!"

Phew, it's as easy as beef bourguignon. That's a relief! [I think it's safe to say that Ina's "everywoman" shtick needs a little work before she has it down as well as Oprah does, but we love her anyway.]

I really haven't had my act together lately -- I'm waaaaay behind on Christmas, I walk into a room and forget why I'm there, I drove halfway to work one day and realized I was still wearing my wicked good slippers, and I'm just generally scatterbrained. In keeping with this lack of togetherness, it seemed like I made a separate grocery trip for each ingredient in this recipe. And I still forgot the fresh thyme.

This recipe calls for a full bottle of dry red wine and some cognac or brandy. I've got to tell you, even at the height of my wild college partying days (okay, so they weren't that wild) I never spent as much time at the package store as I have since I started food blogging. Remember the enthusiastic "NORM!!!" greeting that our favorite barfly used to get whenever he walked into Cheers? Well, when I went into my usual packy the other week for Meyer's, my chain smoking goth rocker cashier friend greeted me with a most friendly and enthusiastic "CATHY!!!," which I am sure violated the Chain Smoking Goth Rocker Code of Behavior (I won't turn him in, though). Clearly, I've become a regular, and that means it's time to find a new packy. Plus, my "usual" cooking booze shop only sells things by the gallon, which was starting to bug me, seeing as I generally only need a teaspoon of whatever it is. So I found a different package store, where I am still anonymous, and the man working there actually recommended a small, $8.99 bottle of brandy! I think I've found my new hard liquor home.

The recipe also says to cut up two whole chickens. It's really best if I don't do that. I'm gonna leave that job to the pros. So I cheated and let Piggly Wiggly do the work for me:


Ina is right -- this recipe is not hard, but I found it to be somewhat labor intensive (and imagine if I cut up my own chicken!) Cut up the vegetables. Add the brandy. Ignite the vegetables . . .

David once established a "no flambé" rule for our kitchen during a weekend trip to New Orleans when I started making noise about making my own Bananas Foster. He just knows me really well. But I was already up to my elbows in this recipe before I realized that I was going to have to violate the house anti-flambé laws and torch the liqour. I sent the kids into the den, pulled my hair into a ponytail, said a prayer, and lit the flame. Ina warned me to stand back, but I still was not prepared for the raging inferno. It was at least two feet high for what seemed like ten minutes (but maybe it was only 10 seconds -- it's like when a baby is crying; time passed in slow motion). Only when the flame came down a bit and I knew that the house was not going to burn down was I able to stop shaking long enough to snap this picture:


The chicken, veggies and wine in the pot before it went into the oven:


And the finished stew:


We were kind of "meh" on this one. David said halfway through that wine/pearl onion is not generally his favorite stew genre, and there's really no getting around the wine in coq a vin (or the pearl onions, for that matter). But maybe part of the problem is that Ina says to use a good dry red like burgundy, and I used a cheap cab. And she says to use cognac or a "good brandy," and I used a cheap brandy. I guess I was trying to skate by without turning this dinner into an honest to goodness investment, and I got what I paid for. We actually liked the flavor of the chicken, but I was not a fan of the broth/stew. But the house smelled great while it was cooking, and now I've made coq a vin, so I'm going to call that a success!

ELLIE

The Ellie pick of the week was Cornmeal Crusted Roasted Ratatouille Tart, chosen by the Wiivers

We loved this one. The ratatouille combines eggplant, zucchini and tomatoes. I don't trust regular winter grocery store tomatoes, so I bought grape, which are usually a little more palatable. Roasting them really brought out the flavor:


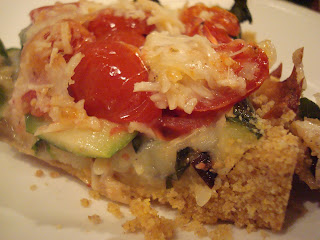
The crust was really interesting. It combines cornmeal and whole wheat flour with a couple of tablespoons of oil and a couple of tablespoons of butter. Not terrible as far as crusts go. And it really tasted great! The texture was crumbly, but it stayed together, and complemented the vegetables nicely. I think this crust would be good with lots of things, particularly tex-mex flavors.


You pretty much assemble this by layering the vegetables, basil, and cheeses. I thought this was a really pretty dish -- here it is with the vegetables and basil before the final cheese topping:


And here it is when it came out of the oven:


We both really enjoyed this one, and I am sure that I'll make it again. It works equally well on its own as a main course, or as a lovely side dish to accompany some coq a vin if that's how things happen to shake out in your blogging schedule. It's so versatile that way!

Thank you, Bethany and Wiivers, for choosing these really great dishes!

Tuesday, December 9, 2008

TWD: Grandma's All-Occasion Sugar Cookies


I could not have been more excited when I saw that Ulrike of Küchenlatein chose sugar cookies for this week's Tuesday with Dorie project! Making Christmas cutout sugar cookies is one of my favorite December traditions, so these could not have come at a better time. And they capped off a fabulous Christmasy weekend, filled with some of our other beloved annual holiday events:

The Town Christmas Parade

We started out early at our town Christmas parade, which my son was marching in with his Cub Scout den. We had to get there at 7:30 a.m., an hour before the parade began, so that our 6 and 7 year old boys would have ample time to run around like wild hellions and whack each other with their candy bags line up for the parade. While David (whom I accidentally volunteered to be the den leader when I cracked under the pressure of nobody else volunteering) wrangled the boys, I tried to score a prime parade viewing spot while chasing my other two in opposite directions and juggling the stroller, the heavy diaper bag filled with blankets, and my venti peppermint mocha. Finally, the parade began. Am I the only one who gets a little choked up at town parades? They are just so darn wholesome. Like most small town parades, ours had the usual assortment of scouts, high school dancers, city council members, marching bands, fire trucks, and scooter-riding Grinches:


And if you weren't careful, you'd get pelted by a Jolly Rancher. It could be any Main Street parade anywhere. Well, okay, we probably have more parading beauty queens here in the South than in other parts of the country. Not that we have more beautiful people, of course. We just like to honor ours more formally, preferably with a tiara.

Trimming the Christmas Tree

Once I let go of my Norman Rockwell visions about how this was going to go for us, everything fell into place. Last year, instead of singing Christmas carols together as we hiked deep into the woods in search of the perfect tree, we grabbed the first tree we saw on the lot next to the BP station while our colicky three month old screamed her fool head off, and then we drove through Little Caesar's for a $5 pizza on the way home. I don't remember that Norman drawing. This year, we refereed numerous squabbles about who got to hang which ornament, chased down our three year old when she decided to streak across the front yard for no apparent reason, and at the end of the day, instead of sipping hot cocoa in front of the fireplace and admiring the tree, raced around with dish towels to clean up the mess made when my kids managed to pull off the never-seen-before milk-spilling hat trick (even our one year old found a way to spill milk out of her spill-proof sippy cup). But that's okay -- we were together, we love each other, and the house got (sort of) decorated. Not Norman, but still good.

The Office Christmas Party

Who doesn't love these? We went to my husband's office Christmas party on Saturday night. Just in case you haven't had the pleasure of attending one before, let me just say: there ain't no party like a law firm Christmas party. All of those lawyers in their campy holiday-themed ties, letting their hair down and reveling in the merriment of the season . . . wooooo! Good times. In all seriousness, my hubs works with some great people, so we got to enjoy a mediocre dinner with our friends while debating the Important Issues of the Day, like whether Elisha Cuthbert is a B-list or C-list actress (I voted B-list based on her work in Old School and was accused of being a grade inflator).

The Making of the Sugar Cookies

But no December tradition is more loved in my house than making Christmas cookies, so these sugar cookies were the highlight of our weekend, hands down. We started making dough first thing in the morning, since I knew that it would need some chill time. In college, we used to watch A Charlie Brown Christmas over and over again this time of year, and our favorite line was by that greedmeister Sally, before she learned the True Meaning of Christmas

(say it with me, Lis): "All I want is what's coming to me. All I want is my fair share." Well, as parents, we feel like one of our most important jobs is to help our kids become less Sally-like and more Linus-like, but we still have a loooooong way to go. So my kids are very concerned about making sure that they get their fair share in the baking department, and if one dumps a cup of flour in the bowl, the other wants to dump a cup of flour in the bowl. If one works the KitchenAid controls:


The other gets to cut the dough in half:


All even-steven. I'm not sure how this is going to go once #3 gets in on the baking action.

This dough was insanely good. I had no idea that sugar cookie dough could be so amazing. However, that's the last dough commentary that you'll be hearing from me, because I realized this weekend that I've GAINED TEN POUNDS since joining TWD in August, so I either need to quit TWD, or at a bare minimum, quit eating dough. I'm going to try to stop eating dough first.

I wish I could quit you:


The dough rolled out fairly well, although not quite as easily as the linzer sable dough. It definitely needs to be well-chilled for these to cut out easily, so I kept returning the dough to the fridge to chill it back up. So if you do these as cutouts, they won't be the quickest cookies you'll ever make, but they are easy enough. And so, so worth it.

My son, using his superhuman strength to cut out a snowman:


I let the kids decorate these by dumping massive amounts of sprinkles on them. After they did a dozen or so cutout cookies, I rolled the remaining dough into a log and did some of the slice and bake kind. I made an extra batch of dough for my freezer, and when I make these again right before Christmas, I might try to do a few cut out cookies with icing. I probably won't waste too much time with the decorating, though, because these don't last long. They pretty much got eaten as fast as I could pull them out of the oven.


These are right up there with the best sugar cookies that I've ever had. It couldn't be a simpler recipe, but as usual, Dorie knocks it out of the park with just the right proportion of ingredients. This is now my new sugar cookie recipe. Thanks, Ulrike, for the picking a cookie that is sure to get everyone in the holiday spirit!
 
Blog Design By: Sherbet Blossom Designs